OBJECT RELATIONAL MAPPERS (
An object-relational mapper (ORM) is a code library that automates the transfer of data stored in relational database tables into objects that are more commonly used in application code.
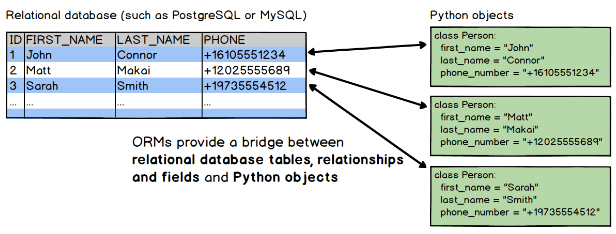
ORMs provide a high-level abstraction upon a relational database that allows a developer to write Python code instead of SQL to create, read, update and delete data and schemas in their database. Developers can use the programming language they are comfortable with to work with a database instead of writing SQL statements or stored procedures.
Example:
SQL:
SELECT * FROM USERS WHERE zip_code=94107;Django ORM:
# obtain everyone in the 94107 zip code and assign to users variable
users = Users.objects.filter(zip_code=94107)
The ability to write Python code instead of SQL can speed up web application development, especially at the beginning of a project.
ORMs also make it theoretically possible to switch an application between various relational databases. For example, a developer could use SQLite for local development and MySQL in production. A production application could be switched from MySQL to PostgreSQL with minimal code modifications.
In practice however, it's best to use the same database for local development as is used in production. Otherwise unexpected errors could hit in production that were not seen in a local development environment. Also, it's rare that a project would switch from one database in production to another one unless there was a pressing reason.
Python ORM libraries are not required for accessing relational databases. In fact, the low-level access is typically provided by another library called a database connector, such as psycopg (for PostgreSQL) or MySQL-python (for MySQL)
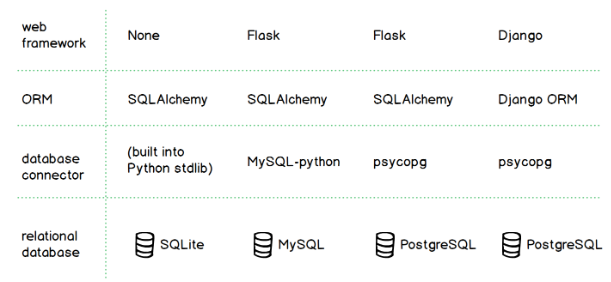
Developers can also use ORMs without a web framework, such as when creating a data analysis tool or a batch script without a user interface.
- Impedance mismatch: the difficulties that occur when moving data between relational tables and application objects. The gist is that the way a developer uses objects is different from how data is stored and joined in relational tables.
- Potential for reduced performance: With ORMs, the performance hit comes from the translation of application code into a corresponding SQL statement which may not be tuned properly.
- Shifting complexity from the database into the app code:
There are numerous ORM implementations written in Python, including:
- SQLAlchemy
- Peewee
- The Django ORM
- PonyORM
- SQLObject
- Tortoise ORM ([source code] (https://github.com/tortoise/tortoise-orm/))
MySQLdb is a Python module that allows Python programs to interface with MySQL databases. It is a third-party library that provides a Python interface to MySQL, which is a popular open-source relational database management system. MySQLdb supports a wide range of MySQL functionality, including transactions, stored procedures, and advanced data types.
To use MySQLdb in your Python project, you first need to install it. You can install it using pip, the Python package manager, with the following command:
pip install mysqlclientOnce installed, you can use MySQLdb to connect to a MySQL database using the connect() method, which takes a number of parameters including the host, user, password, and database name. For example, to connect to a local MySQL database with a user root and password password, you can use the following code:
import MySQLdb

# Connect to the database
conn = MySQLdb.connect(host='localhost', user='root', passwd='password', db='mydatabase')
Once you have a connection object, you can use it to execute SQL statements using the execute() method, and retrieve the results using the fetchone() and fetchall() methods. For example, to execute a simple SQL statement to retrieve all rows from a table named mytable, you can use the following code:
# Create a cursor object to execute SQL queries
cur = conn.cursor()

# Execute a query
cur.execute('SELECT * FROM mytable')

# Fetch the results
rows = cur.fetchall()
Clean up is an easy process. All you need to do is close all open cursors, and close all open database connections. Each cursor and each database connection has a 'close' function, call this for each instance you have created.
import MySQLdb

# Create a database connection
conn = MySQLdb.connect(host='localhost', user='username', passwd='password', db='database_name')

# Create a cursor object
cur = conn.cursor()

# Execute a query
cur.execute('SELECT * FROM mytable')

# Process the query results
rows = cur.fetchall()
for row in rows:
    print(row)

# Close the cursor and database connection
cur.close()
conn.close()
By doing this, you ensure that you're freeing up any resources used by your database connection and cursor. This is especially important if your application needs to connect to a database multiple times or for long periods of time.
The SQLAlchemy Object Relational Mapper presents a method of associating user-defined Python classes with database tables, and instances of those classes (objects) with rows in their corresponding tables.
To start using SQLAlchemy, you'll need to install it first. You can install it using pip by running the following command:
pip install SQLAlchemyimport sqlalchemy
sqlalchemy.__version__
1.3.0engine = create_engine('mysql+mysqldb://{}:{}@localhost/{}'.format("root", "root", "my_db"), pool_pre_ping=True)
Base.metadata.create_all(engine)
session = Session(engine)
for state in session.query(State).order_by(State.id).all(): # HERE: no SQL query, only objects!
print("{}: {}".format(state.id, state.name))
session.close()The code shows how to use SQLAlchemy to interact with a MySQL database using Python. Here's a breakdown of what the code does:
- The first line creates a database engine using the
create_enginefunction from SQLAlchemy. The engine connects to a MySQL database named "my_db" running on localhost, using the username and password "root". Thepool_pre_ping=Trueparameter enables automatic pinging of connections before using them, to check if they are still valid. - The
Base.metadata.create_all(engine)line creates all the tables defined in the Base class using the metadata of the database engine. This ensures that the tables are created in the database before any data is inserted. - The
Session(engine)line creates a session object that represents a transactional unit of work with the database. The session object is used to issue queries and manage data. - The for loop queries all the
Stateobjects in the database, sorts them by their id attribute, and prints their id and name attributes. - The
session.close()line closes the session and releases any resources associated with it.
we will use an in-memory-only SQLite database. To connect we use create_engine():
from sqlalchemy import create_engine
engine = create_engine('sqlite:///:memory:', echo=True)- The
create_enginefunction takes a database URL as its argument. In this case, the URL is'sqlite:///:memory:', which instructs SQLAlchemy to create a SQLite database in memory. This means that the database will exist only for the duration of the Python session and will be deleted when the session ends. - The
echo=Trueparameter enables logging of all SQL statements issued by SQLAlchemy to the console. This can be useful for debugging and understanding what is happening under the hood.
The base class will be used as the parent class for all ORM models defined in the application.
By defining a model as a subclass of the declarative base class, SQLAlchemy can automatically generate the necessary SQL statements to create and modify the corresponding database tables.
from sqlalchemy.ext.declarative import declarative_base

Base = declarative_base()
Now that we have a “base”, we can define any number of mapped classes in terms of it.
This code defines a mapped class called User that maps to a database table called users.
from sqlalchemy import Column, Integer, String
class User(Base):
    __tablename__ = 'users'

    id = Column(Integer, primary_key=True)
    name = Column(String)
    fullname = Column(String)
    nickname = Column(String)

    def __repr__(self):
       return "<User(name='%s', fullname='%s', nickname='%s')>" % (
                            self.name, self.fullname, self.nickname)
__tablename__ = 'users': This line specifies the name of the database table to which the User class will be mapped.
A class using Declarative at a minimum needs a tablename attribute, and at least one column which is part of a primary key.
With our User class constructed via the Declarative system, we have defined information about our table, known as table metadata. The object used by SQLAlchemy to represent this information for a specific table is called the Table object.
We can see this object by inspecting the __table__ attribute. By inspecting the Table object, we can see that it contains metadata about the table, including the table name, the columns in the table, and their data types.
User.__table__
Table('users', MetaData(bind=None),
            Column('id', Integer(), table=<users>, primary_key=True, nullable=False),
            Column('name', String(), table=<users>),
            Column('fullname', String(), table=<users>),
            Column('nickname', String(), table=<users>), schema=None)
As our SQLite database does not actually have a users table present, we can use metadata to issue CREATE TABLE statements to the database for all tables that don’t yet exist. Below, we call the MetaData.create_all() This line creates all the tables defined in our metadata by issuing a CREATE TABLE statement to the database. The engine object passed to the function provides the connection to the database.
Base.metadata.create_all(engine)This is an important note about the use of String datatype in SQLAlchemy's ORM. The String datatype in SQLAlchemy is a variable-length string type that can be used to store character data. However, different databases have different rules regarding the length of string columns. For example, MySQL requires a maximum length for VARCHAR columns.
To ensure compatibility across different databases, SQLAlchemy provides the option to specify a length parameter for the String datatype. This can be done by passing an integer value to the String constructor, as shown below:
Column(String(50))This specifies that the column should be of type VARCHAR(50).
Another point to keep in mind is that some databases require sequences to generate new primary key identifiers. For example, Firebird and Oracle require sequences. In such cases, you can use the Sequence construct in SQLAlchemy to generate a sequence object and use it to assign primary key values to new records.
A full, foolproof Table generated via our declarative mapping is therefore:
from sqlalchemy import Sequence

class User(Base):
    __tablename__ = 'users'
    id = Column(Integer, Sequence('user_id_seq'), primary_key=True)
    name = Column(String(50))
    fullname = Column(String(50))
    nickname = Column(String(50))

    def __repr__(self):
        return "<User(name='%s', fullname='%s', nickname='%s')>" % (
self.name, self.fullname, self.nickname) ed_user = User(name='ed', fullname='Ed Jones', nickname='edsnickname')
ed_user.name
'ed'
ed_user.nickname
'edsnickname'
str(ed_user.id)
'None'We’re now ready to start talking to the database. The ORM’s “handle” to the database is the Session.
We can create a factory for new Session objects by defining a Session class using the sessionmaker function. This function takes the engine as a parameter and returns a new Session class that we can use to instantiate new session objects.
from sqlalchemy.orm import sessionmaker
Session = sessionmaker(bind=engine)
We can define the Session class at the same level as our create_engine() statement, or we can define it later if we don't yet have an engine. Once the engine is available, we can connect it to the Session using sessionmaker.configure().
Session = sessionmaker()Session.configure(bind=engine) # once engine is availablewhenever you need to have a conversation with the database, you instantiate a Session.
session = Session()# create a new User object
new_user = User(name='John', fullname='John Doe', nickname='johndoe')
# add the new user to the session
session.add(new_user)
# commit the session to persist the changes to the database
session.commit()To update an existing object, we can simply modify its attributes and commit the changes through the Session:
# Query the user we want to update
our_user = session.query(User).filter_by(name='ed').first()

# Modify the object
our_user.nickname = 'newnickname'

# Add the modified object to the session
session.add(our_user)

# Commit the changes
session.commit()
The add_all() method allows you to add multiple objects to the session at once, which can be more efficient than adding them one at a time. Here's an example of how you can use it:
users = [
    User(name='wendy', fullname='Wendy Williams', nickname='windy'),
    User(name='mary', fullname='Mary Contrary', nickname='mary'),
    User(name='fred', fullname='Fred Flintstone', nickname='freddy')
]

session.add_all(users)
After adding or updating objects, we need to commit the changes to the database using session.commit(). This will flush any remaining changes to the database and end the current transaction.
It's important to note that commit() will raise an exception if there are any conflicts with the database, such as violating a unique constraint or a foreign key constraint. In such cases, the transaction will be rolled back and the exception will be propagated to the calling code.
In SQLAlchemy, querying is done using the Query object, which is created by calling the query() method on a Session object.
users = session.query(User).all()This will return a list of all User objects in the database.
To filter the results, you can chain one or more filter() calls to the query:
user = session.query(User).filter_by(name='ed').first()This will return the first User object in the database where the name attribute is 'ed'.
You can also use comparison operators in the filter() call:
users = session.query(User).filter(User.id > 1).all()Additionally, you can use other methods like order_by() to specify the order in which the results should be returned, limit() to limit the number of results returned, and offset() to skip a certain number of results.
users = session.query(User).order_by(User.name.desc()).limit(2).offset(1).all()This will return the second and third User objects in the database, ordered by their name attribute in descending order.
Finally, you can use aggregate functions like count() and sum() to retrieve aggregated data:
user_count = session.query(User).count()This will return the total number of User objects in the database.