User journey: Create, Update and GET Employee Details
Visit here for a quick introduction to What is Declarative Testing And Zerocode
- Quick Overview
- User Journey To Test Case(example)
- How Did It Work(Step By Step)
- If You Have Time to Read
- What We Did Not Have to Do(luckily)
- See Things In Action
The simplicity of this automated testing style that might surprise we...
In Declarative Testing, the framework here does the job for us behind the scene i.e.
- Making Http calls to the target end-point, with our request payload
- Receiving the server response into the test case
- Doing the result comparison of the actual vs expected response for our "assertions".
- Here we can choose to skip the fields we do not need to assert
- Or keep some fields as
not nullif server response is in-deterministic - We keep the payload as JSON with its structure intact
It saves us from the major hassles of writing any code to do the above repetitive tasks.
Let's see how it is applied in a user journey.
- AC1
GIVEN- The Create API POST:"/api/v1/persons"
WHEN I invoke the POST operation with a "person" payload
THEN I will create a new employee
AND assert the 201(created) status
and newly created employee ID.
- AC2
GIVEN- The Update API PUT:"/api/v1/persons/{personId}"
WHEN I invoke the PUT operation by the Id
with some "person" details
THEN I will update the existing employee
AND assert the 200(OK) status and updated fields.
- AC3
GIVEN- The Get API GET:"/api/v1/persons/{personId}"
WHEN I invoke the GET operation
THEN I will fetch the employee details
AND assert the status 200(OK) along with
updated as well as non-updated fields
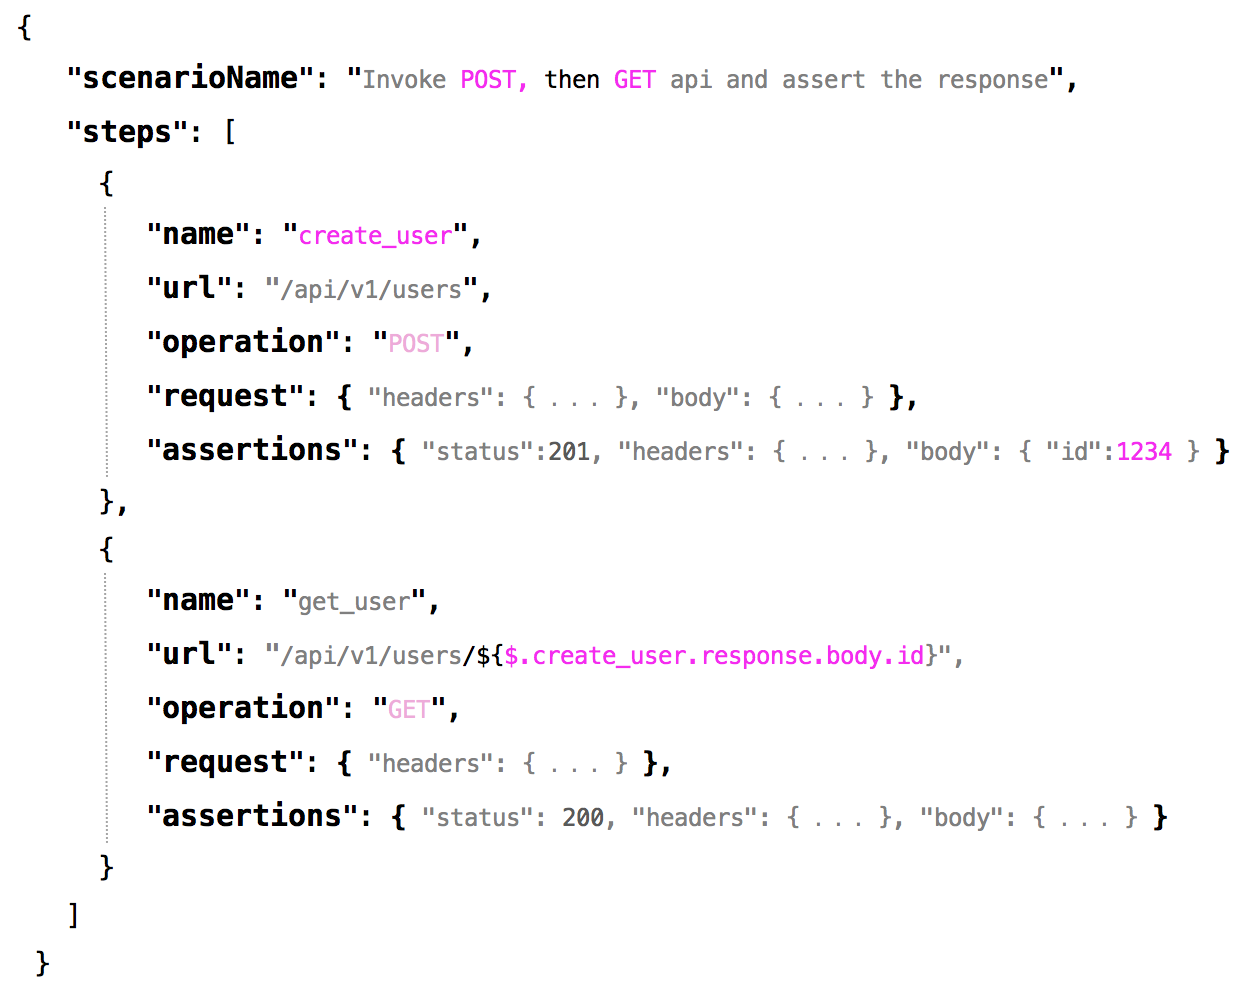
To write a test-case for the above CRUD operation scenario is quite easy using Zerocode, just our IDE's JSON editor is easy enough to hook these steps. For instance, POST and GET step would look like below(simple and clean).
Hosts and ports are externalized to a properties file as usual
And at the same time we don't have to search for or think hard of any syntaxes to do the job. That means, we are ready with a BDD scenario test in a couple of minutes with these simple JSON steps(see below). Advantage here is the tests are instantly readable to anyone because of, it enables the JSON payload structure as it is with no manipulation needed.

That's it, done. We are ready to run.
The hosts and ports in the url fields are externalized as usual(explained below).
Then we stick the above json file to a JUnit runner and run. We can point to any host and port in the Runner. See the sample below.
@TargetEnv("application_host.properties")
@RunWith(ZeroCodeUnitRunner.class)
public class JustHelloWorldTest {

    @Test
    @JsonTestCase("helloworld/user_crud_journey_test.json")
    public void testGet() throws Exception {
       // No code is needed here.
    }
}
the application_host.properties looks as below:
web.application.endpoint.host=https://hbc.banking.co.local.uk
web.application.endpoint.port=443
web.application.endpoint.context=
Let's put into the context n deep dive a bit.
We needed 3 steps here for the Happy case in the above journey-
- POST - To create the new employee (e.g. created employee ID will be
1001) - PUT - To update the same employee
- GET - To verify that UPDATE has gone fine
This is how somewhat we imagined to perform the steps-
 Note- You can use any JSON editor to do the job for we -as simple as that
Next we get our API end points details from the spec or api-doc(e.g. swagger) and fit into the steps(it should look like below)

Next let's Copy-Paste the payload and assertions section which we might get it from the spec or api-doc(swagger). See below the full-blown steps(That's it - we are ready to run.) How simple was that !

To complete the D part the CRUD operation(if our application has implemented this operation), we can simply add one more step or 2 more steps as below to verify it works perfectly ok.

Done. Happy days !
If we have little more time to read below, see what all hassles we escaped and how much time we saved !
- No need to write pojos and builder for the domain objects(e.g. Employee here)
- No need of any serialization/deserialization
- No need of http client calls and read the response
- No need to
assertThat(expected, is(actual))etc multiple times - No need of any feature files and syntax searchings
- No need of English statements and grammars
JOURNEY1 :
- Step 1
Employee emp =
EmployeeBuilder.aNewInstance();
.name("Larry P")
.job("Full Time")
.build()
Make the POST call
ObjectMapper objectMapper = ObjectMapperProvider.getInjectedObjectMapper();
HttpResponse postResponse =
aHttpClient.post("http://host:port/api/v1/persons")
.header("accept", "application/json")
.body(objectMapper.writeValueAsString(emp))
.execute();
Assert the response
assertThat(postResponse.getStatusCode(), is(201))
assertThat(postResponse.getEntity().getId(), is(1001))
- Step 2
Create an employee with updated payload
Employee empForUpdate = EmployeeBuilder.aNewInstance()
.name("Larry Page")
.job("Co-Founder")
.build();
Make a PUT call
HttpResponse putResponse =
aHttpClient.put("http://host:port/api/v1/persons/" + postResponse.getEntity().getId())
.header("accept", "application/json")
.body(objectMapper.writeValueAsString(empForUpdate))
.execute();
Employee empUpdated = response.getUser();
Assert the response
assertThat(putResponse.getStatusCode(), is(200))
assertThat(empUpdated.getName(), is(empForUpdate.getName()))
assertThat(empUpdated.getJob(), is(empForUpdate.getJob()))
- Step 3
Make the GET call
HttpResponse response =
aHttpClient.get("http://host:port/api/v1/persons/" + postResponse.getEntity().getId())
.header("accept", "application/json")
.execute();
Employee empFetched = response.getEmployee();
Assert the response
assertThat(response.getStatusCode(), is(200))
assertThat(empFetched.getName(), is(empForUpdate.getName()))
assertThat(empFetched.getJob(), is(empForUpdate.getJob()))
Also, we escaped the hard way of doing things with special attention to English statements and grammars. See below:
This approach might take different shapes and forms for developers/testers with spending too much time agreeing on the semantics than spending time in writing actual executable tests.
e.g.
GIVEN- the REST api POST end point,
WHEN- I invoke the API with a payload,
THEN- I will receive 201(Created) status with a newly created ID and assert the response
or
GIVEN- the REST url and the method POST,
WHEN- I invoke the API with a body,
THEN- I will receive 201(Created) status with newly created ID
AND assert the response
or
~~GIVEN- the REST url /api/v1/persons/ ~~
~~AND the http method POST ~~
WHEN- I invoke the API using a HTTP client and send the body,
THEN- I will receive 200(OK) status with body
AND assert the response
and so on...
Note- Too much is going on the above around an user journey, in terms of writing correct sentences or nearly correct sentences/grammars, too many assertThats to come up with a test scenario.
And imagine the situation we will be when we have more number of steps in an user journey !
:::Note:::
It makes sense when the BAs(Business Analysts) or managers or non-technology folks while creating the stories and defining the entry and exit criteria of the tickets for a business scenario or User-Journey. But technology folks simply picking these statements and trying hard syntactically to fit these into executable tests seems like bit too much of an overhead.
But we should choose the tools, technologies and solutions which best fits to our project and situation and helps us solving the testing challenges.
The simplified HelloWorld projects are in GitHub repo to clone and run locally
-
Simple HelloWorld repo : https://github.com/authorjapps/zerocode-hello-world
-
(More examples and usages : https://github.com/authorjapps/zerocode/blob/master/README.md#hello-world )